Create new campaign
THIS ARTICLE IS NOT UPDATED. WE ARE ON THE INTERCOM NOW!
http://help-center.peerclick.com/en
JOIN US THERE AND WATCH ALL UPDATED PEERCLICK GUIDES!
Creating a new campaign
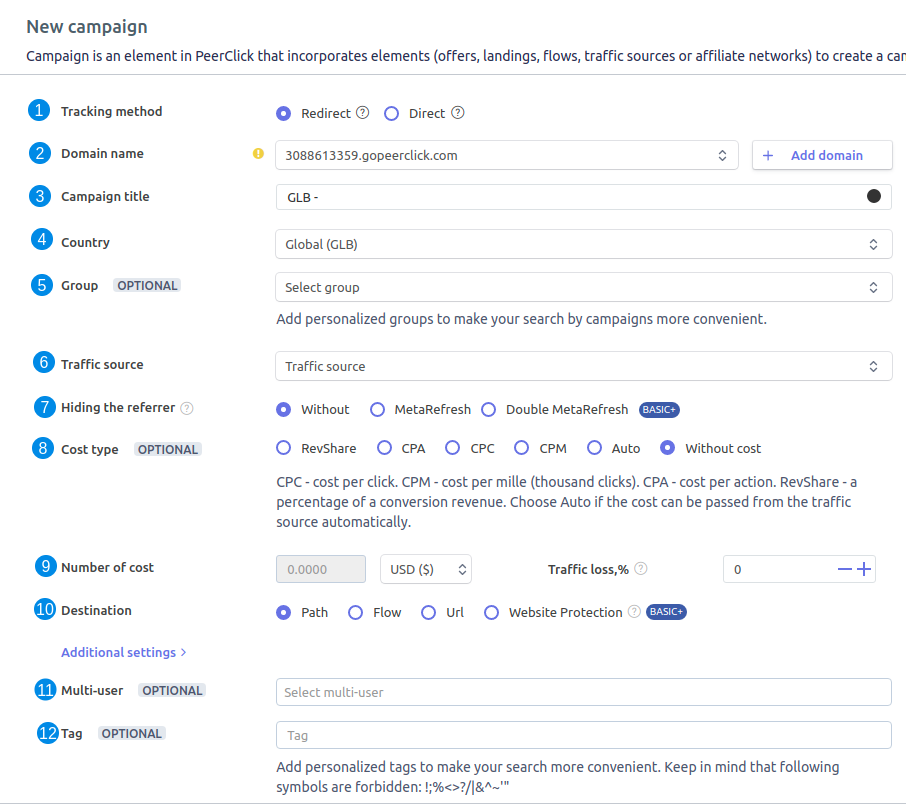
Go to the Campaigns tab and click the +New button on the left side of the dashboard.
Set your campaign parameters:

- Tracking method
Changes view of campaign settings window due to your needs. Redirect setting will show your campaign link while editing a campaign, Direct setting will show Direct tracking Pixel and Postback Pixel fields while editing a campaign.
- Domain name
A default test domain is provided for each user. We recommend replacing it with a custom one. You can select your custom domain from the campaign domain drop-down menu. It will be used to generate your campaign URL.
- Campaign title
Give a name to your campaign in this field. You can also choose a text colour for the campaign name you entered.
- Country
Select a country from the drop-down menu. The country you select will be shown in your campaign name.
- Group
Choose a group for the campaign. It’s convenient to group campaigns by verticals, countries, type of traffic. To create a new group, go to Settings - Groups.
- Traffic Source
Select the traffic source from the drop-down menu that you have previously created in the Sources tab.
- Hiding the referrer
This setting is used to conceal your landing page from the affiliate network. If you do not use any special scripts to replace the referrer, we recommend selecting the Meta Refresh option.
- Cost type and Number of cost
Specify the cost model you use to buy traffic in the Cost type section. CPC - cost per click. CPM - cost per mille (thousand clicks). CPA - cost per action. The cost of a click will be assigned after conversion. RevShare - the cost model which is calculated as a percentage of a conversion revenue. Choose the Auto option if the cost can be passed from the traffic source automatically.
Set the cost value and currency in the Number of cost section.
- Traffic loss, %
While working with a traffic source, a certain percentage of traffic can be lost on the way to the tracker. It may vary significantly depending on the country. With PeerClick you can set the traffic loss percentage for each campaign.
Use the following formula to calculate traffic loss: new cpc = cpc / ( 1 - ( losses / 100 ) )
- Destination
Select your traffic destination: Path, Flow, URL, Web-site Protection. After selecting any of the four destination options, the settings for it will become available on the right side of the screen.
- Multi-user
Select a multi-user to give access to your campaign if needed.
- Tag
You can add tags to the campaign to make your search more convenient.
Additional settings
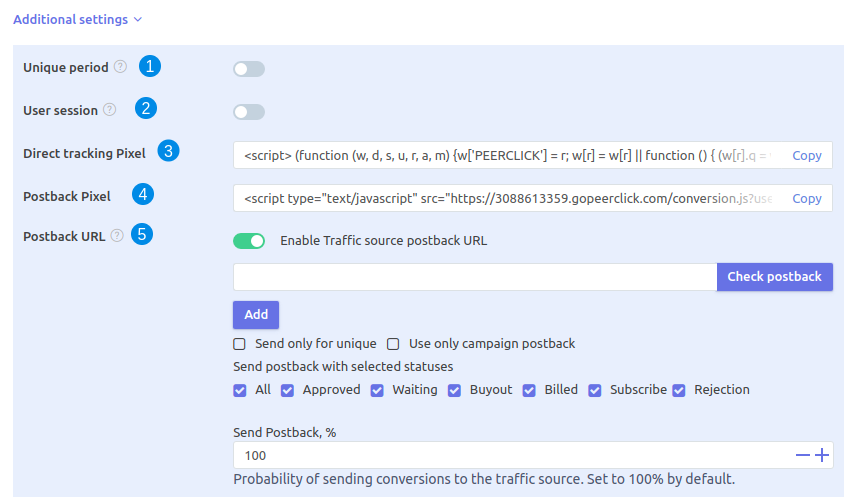
Click Additional settings to open additional menu field and configure the settings. You will see only Unique period and User session settings while creating a new campaign. Other additional settings will be shown while editing a created campaign.

- Unique period
A specified time period in seconds after which a click on your tracking link/pixel is considered unique again.
- User session
Cookies lifetime period. After the period specified in seconds, postback pixel and click-through from the landing page to the offer stop working. Setting a cookie lifetime to 0 will disable the storage of cookies, the postback pixel or click-throughs from lander to offer will not function.
- Direct Tracking Pixel
Direct Tracking Pixel is a piece of code that can be placed on your website or landing pages. It enables you to send traffic directly to your landing page and track visits without a redirect.
- Postback Pixel
Postback Pixel is used to track and pass conversions to PeerClick from the website where it is placed. Postback pixel is a piece of code that should be added to a confirmation or a “thank you” page. It is often used by webmasters for conversion tracking on the website.
- Postback URL
Postback URL lets you pass data on conversions to the traffic source or other services if required. In order to use it, simply paste the URL in the Postback URL field in Additional settings. By default, the Postback URL of the traffic source previously configured and added to the campaign is used.
Postback URLs include unique parameters defined by the traffic source to send specific data variables.
Destination : Path

Default paths
-
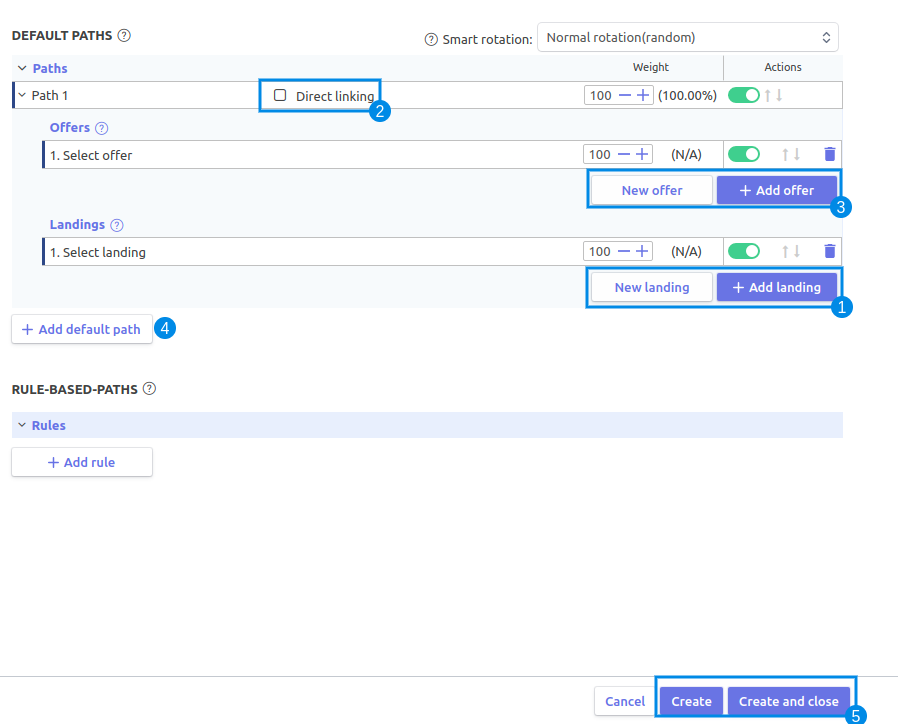
On the right side of the screen, click Select lander or the +Add lander button to add a landing page from the pop-up window. You can easily find the right one using groups, tags or the search field.
-
Check Direct linking if you want to send traffic directly to the offer.
-
Click Select offer or the +Add offer button and choose an offer from the pop-up window.
You can create and add a new offer or a landing page to your campaign by clicking the New offer or New lander button in the campaign settings. -
To set up several paths in the campaign, click +Add default path.
-
After setting up all the campaign parameters, click Create or Create and Close to save the campaign.
Updated over 5 years ago
